Specifying Predefined Strand Patterns in the Library
In the Beam Sections Library, when you open the editor for defining or modifying any I-Girder section, you see the I Beam or Bulb Tee Section. (For more details on this screen, refer to the General Operations section.) Click the Patterns button to bring up the Strand Pattern. Now select the specific Strand ID for the strand pattern you wish to design.
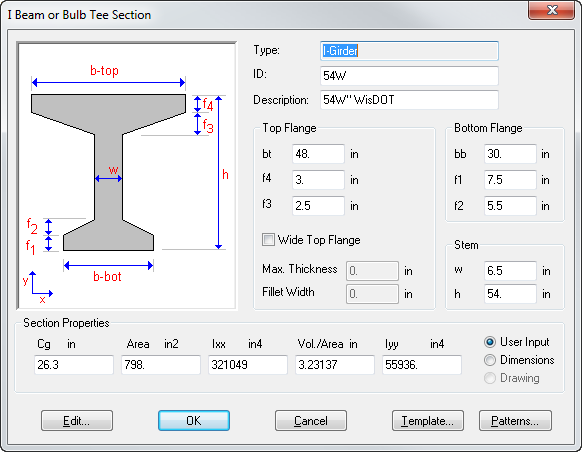
Figure 1 I-Girder section type editor.
You can use the Add, Delete, Modify and Copy buttons on the Strand Patterns screen to manage the individual strand patterns. Select any of the items under Pattern ID and click the appropriate action button. For example, clicking the Modify button will allow you to modify the selected pattern using the Strand Pattern Editor screen.

Figure 2 0.6 Strand selected shows numerous predefined strand patterns with both straight strands as well as a combination of draped and straight strands.

Figure 3 Strand Pattern Editor
On the Strand Pattern Editor screen you are inputting a specific pattern with a unique name (Pattern ID) for a specific Strand ID. Using the three fields for mid-height (measured from the bottom of the beam to the center of the strand), # Strands (which is the total number of strands at a location), and # Draped Strands and the action buttons Add, Delete, Modify and Clear All, you can specify a detailed strand pattern. Next, click the OK button to go to the Strand Patterns screen, and back each step until you get to the Beam Sections screen where you should click the Save button to save the input.
Compared to the Templates Editor, notice that one of the key differences is that in the Strand Pattern Editor, we are now specifying the pattern at the middle of the beam rather than at the end. All strands specified as draped strands are expected to be located in the vertical web zone, and are always draped relative to the top most draped strands which are draped to 2" from the top of the beam.
After defining the predefined strand pattern in the library, the next step is to use it within the program. As a first step, in the Geometry tab, select the beam section for which a strand pattern has been defined. As you progress through the input make sure you select the same strand ID in the Material tab as you had input. After running analysis and selecting the appropriate span number and beam number on the Beam tab, click the Strand Pattern button to bring up the screen. You will notice a check box for Predefined Patterns. Checking this box will bring up the Predefined Strand Pattern selection box. The user can select from the list of predefined strand patterns and the specific pattern is loaded into the grid on the lower-left of the screen.
The usual sequence of clicking on design status to check the validity of the design can be followed. If the selected predefined strand pattern has draped strands, then the program internally computes the depress point, by raising all of the strands in the vertical portion of the web to the top (while maintaining relative spacing between strands) at the end of the beam. The depress point value specified by the user on the Material tab is no longer used for these cases.
In addition to manually selecting a predefined strand pattern, you can alternatively click the Auto Design button and the program will cycle through the available strand patterns (starting with the pattern having the lowest number of strands) and attempt to select a valid strand pattern that satisfies both relief and final stresses and ultimate moment.

Figure 4 Option for predefined patterns is displayed in the Strand Pattern screen.